This guide shows how to DirectAdmin install on AlmaLinux 10, after your VPS installation. It’s using tested CLI commands — including how to check your DirectAdmin license key and what to expect when the CustomBuild runs automatically after first login. A Quick Commands section is provided now for experienced users’ immediate copy‑use but these are individually a part of the DirectAdmin installation.
Table of Contents
Preparing for Successful Installing DirectAdmin
DirectAdmin System Requirements and Supported Operating Systems
Before you begin, ensure your VPS server meets the DirectAdmin system requirements:
- Operating Systems: Compatible with AlmaLinux, AlmaLinux 9, AlmaLinux 10, CloudLinux, and other Linux distributions. This guide is for installing DirectAdmin AlmaLinux 10.
- Hardware: Recommended minimum 2 GB, at least 20 GB disk space.
- Network: Static IP address and a valid hostname.
- Finally, before you start, make sure you’ve completed the How to Set Up a Linux VPS – Commands Checklist so your AlmaLinux 10 server is updated, secured, and ready for DirectAdmin.

Essential Prerequisites: Server Access, Root Privileges
- Root Access: You need root privileges to the server.
- Server Access: SSH access is not required but is highly desired to your VPS server for executing commands. Any terminal session using a server’s administrative credentials works fine.
Backup Considerations Before Installing DirectAdmin
- This guide was tested using a fresh VPS with AlmaLinux. If yours, however, is a pre-existing server, always backup existing data and configurations to prevent data loss.
- Use reliable backup tools and/or scripts to save server configurations, databases, and website files.
Essential Prerequisites: Server Access, Root Privileges
- Root Access: You need root privileges to the server.
- Server Access: SSH access is not required but is highly desired to your VPS server for executing commands. Any terminal session using a server’s administrative credentials works fine.
- TIP: Some server hosting won’t allow you to add SSH keys later so, it really is best to plan on setting up your VPS with SSH keys to begin with.
Applying Pre-requisites Before DirectAdmin Install
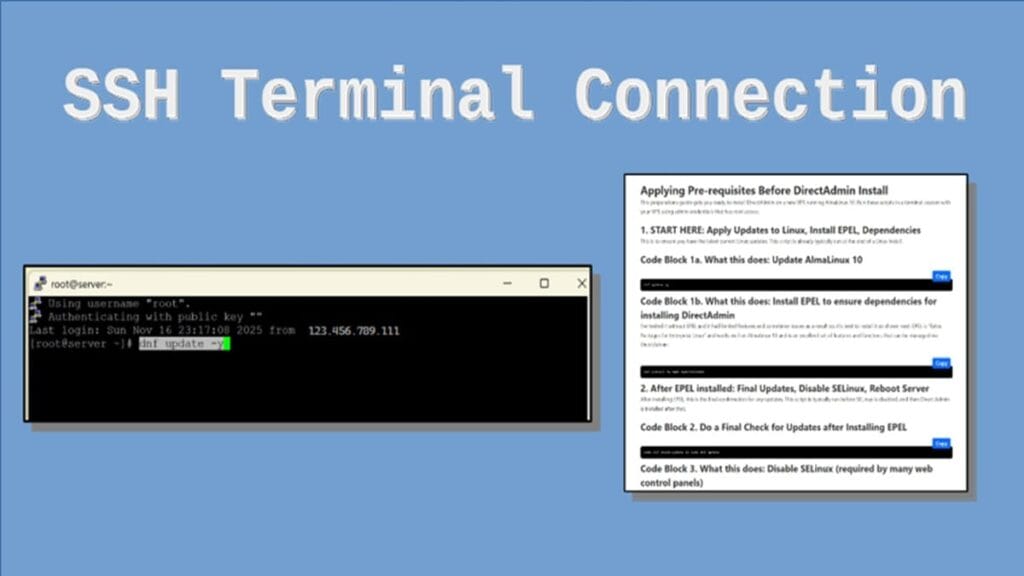
This preparations guide gets you ready to install DirectAdmin on a new VPS running AlmaLinux 10. Run these scripts in a terminal session with your VPS using admin credentials that has root access.
1. START HERE: Apply Updates to Linux, Install EPEL, Dependencies
This is to ensure you have the latest current Linux updates. This script is already typically run at the end of a Linux install.
Code Block 1a. What this does: Update AlmaLinux 10
dnf update -y
Code Block 1b. What this does: Install EPEL to ensure dependencies for installing DirectAdmin
I’ve tested it without EPEL and it had limited features and sometimes issues as a result so, it’s best to install it as shown next. EPEL is “Extra Packages for Enterprise Linux” and works well on AlmaLinux 10 and is an excellent set of features and functions that can be managed via DirectAdmin.
dnf install -y wget epel-release
2. After EPEL installed: Final Updates, Disable SELinux, Reboot Server
After installing EPEL, this is the final confirmation for any updates. This script is typically run before SELinux is disabled, and then Direct Admin is installed after that.
Code Block 2. Do a Final Check for Updates after Installing EPEL
sudo dnf check-update && sudo dnf update
Code Block 3. What this does: Disable SELinux (required by many web control panels)
IMPORTANT: This will also REBOOT SERVER at end of running script.
rpm -q grubby && sudo grubby --update-kernel ALL --args selinux=0
reboot
Code Block 4. What this does: Optionally Run (after previous reboot) to verify SELinux is Disabled
getenforce
You’re Ready to Download & Install DirectAdmin
- IMPORTANT: Read all listed items in these instructions before you install DirectAdmin.
- Copy the below script and paste it into notepad or other plain text editor.
- Replace the customized items with your own values, e.g., server name, license key, etc.
- Required items to replace with your actual values are identified by text starting with “ReplaceWith…”.
- Copy your updated text content to paste and apply in your administrative terminal session.
- Finally, you’ll need to have your DirectAdmin license key ready to use.
Get your DirectAdmin License Key
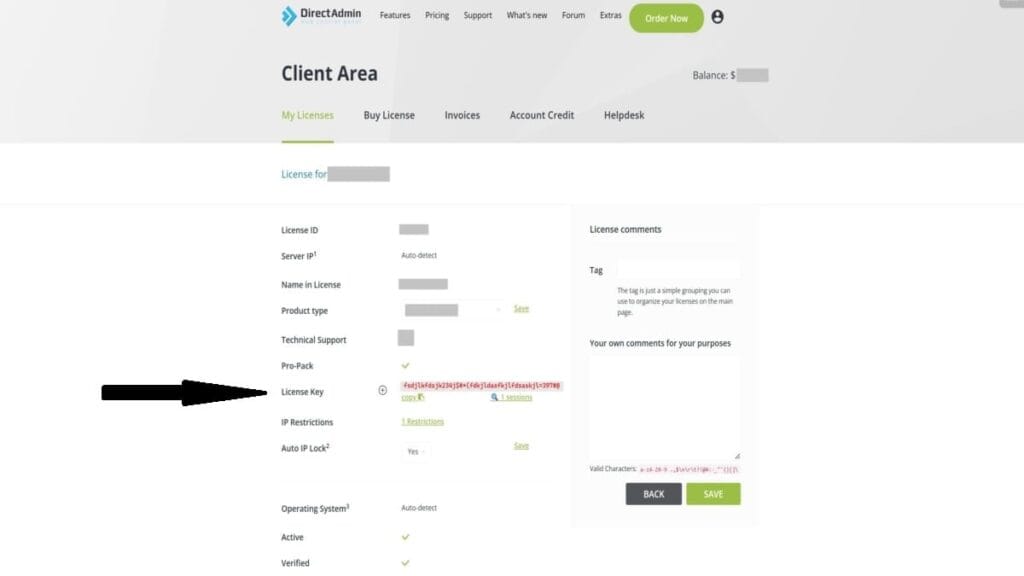
Get your key from a DirectAdmin Check License method. Over the years, some methods come and go but the one that stays is to just logon to your account. So, follow these easy-to-follow steps to get your DirectAdmin License Key:
- Go to https://DirectAdmin.com and tap on the neutral-looking person icon to get a logon prompt.
- After you Sign In using your Client ID and password, tap on <Licenses>.
- Then, in the tab “My Licenses”, tap on the applicable License ID (number) to bring up its details.
- On the item “License Key”, tap the “copy” icon and paste that value somewhere for you to use it in the upcoming script.
- DirectAdmin Check License: Verify the allowed IP address
- While in the license details, on the item “IP Restrictions”, tap on the underlined URL named like “N Restrictions”, where ‘N’ is a number representing a quantity of IP addresses.
- When the restrictions screen opens, review the “Allowed IP Range Prefix”. Manually check to confirm your current VPS server is using an IP noted in that listed range. If not, you can populate the “Add Restriction” with the correct IP address and then tap on <ADD>.
- CAUTION: Depending on your license limits, you might have to first remove an IP from the approved list so, use extreme caution on this as you might disable another DirectAdmin control panel you have on another server elsewhere.
- Any changes to IP restrictions sometimes take a short while to propagate.
Code Block 5. What this does: Downloads DirectAdmin, Assigns your custom Environment Variables
Example custom environment variables:
- DA_HOSTNAME: server.myvpsdomain.com
- DA_NS1: ns1.myvpsdomain.com
- DA_NS2: ns2.myvpsdomain.com
- DA_ADMIN_PASSWORD: loe8wiKPq23$k#ljjk
- DA_EMAIL: admin@myvpsdomain.com
Don’t Forget:
- Copy this below script, paste it into a text editor, and replace text values that start as “ReplaceWith…” using your own values, e.g., your server’s planned name, your DirectAdmin license key, etc.
- Then, copy that updated text into your terminal session to run it, using your own values.
cd /root/
wget -O setup.sh https://download.directadmin.com/setup.sh
chmod 755 setup.sh
export DA_HOSTNAME=ReplaceWithYourFullHostName
export DA_NS1=ReplaceWithYourNS1nameserverName
export DA_NS2=ReplaceWithYourNS2nameserverName
export DA_ADMIN_USER=admin
export DA_ADMIN_PASSWORD=ReplaceWithYourDesiredAdminPassword
export DA_EMAIL=admin@ReplaceWithThisVPSdomainName
Code Block 6. What this does: Apply your DirectAdmin license key & Install DirectAdmin
- Be sure to replace the identified text with your DirectAdmin license key.
- Retain the space before the license key.
- Your license key is matched to your server’s IP address; otherwise, it won’t work.
bash setup.sh ReplaceWithYourDirectAdminLicenseKey
Critical Steps AFTER Installing DirectAdmin: DON’T Restart Server Until the End of All Steps
- IMPORTANT: When install is done, you’ll see final messages in your terminal session’s screen. You MUST copy & save the displayed Temporary Login credentials OR the temp URL for logging in directly. However, the temp login credentials will match what you customized, if you used that as part of your environment variables.
- You can change this temp admin pwd now or later; however, it might match your previously designated password (DA_ADMIN_PASSWORD) if you applied one in your installation script.
- Optional: To change admin temp pwd now, follow these steps in the current terminal session (don’t’ reboot):
- Run this script (while logged in as admin, like your currently are). There will be 2 repeated prompts requesting new password to finish.
- Optional: To change admin temp pwd now, follow these steps in the current terminal session (don’t’ reboot):
Code Block 7. What this does (if not applied during install): Optionally run it to Change system assigned admin password
This is if you didn’t assign your own admin password during the custom script install and you want to change the system assigned temp password now. So, you can run this even after installing DirectAdmin.
passwd admin
- Exit your terminal session but, don’t restart server or any services.
Logging into DirectAdmin
- Important: Don’t reboot server yet, during these steps. I’ll let you know when you can.
- From your Browser, logon as ‘admin’ using temp (or updated) password to any of the following URLs:
- Note: replace URL portions as identified. Examples are shown for better understanding.
- http://server-ReplaceWithYourIPaddress.da.direct:2222/
- Example: https://server-123.456.789.111.da.direct:2222/
- http://ReplaceWithYourIPaddress:2222/
- Example: http://123.456.789.111:2222/
- http://ReplaceWithYourFullHostName:2222/
- Example: http://server.mydomain.com:2222/
- For extensive details on the first time login, see the official article “Accessing DirectAdmin Panel“.
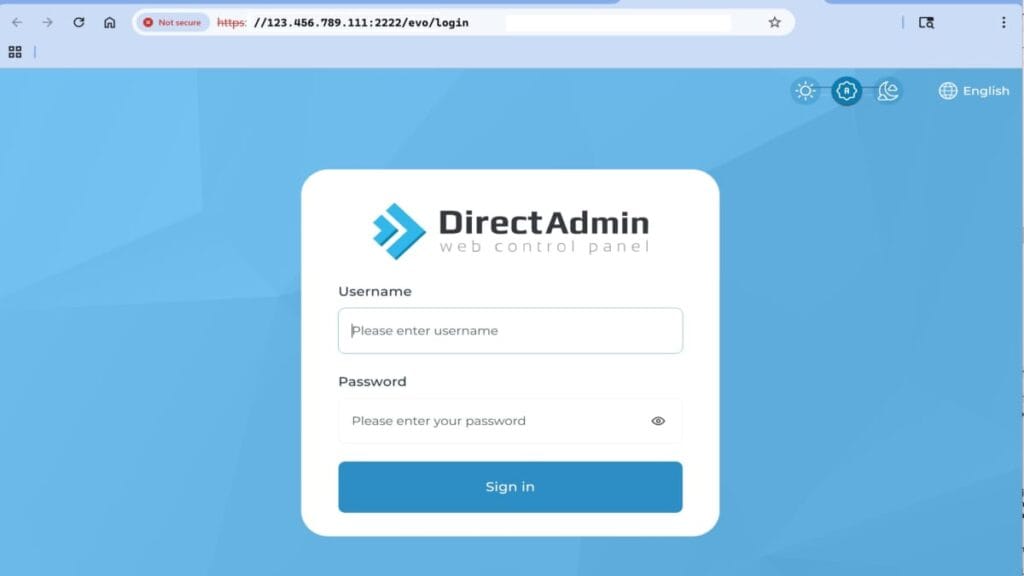
Important — CustomBuild Runs Automatically After First DirectAdmin Login
When you log into DirectAdmin for the first time, the CustomBuild process will start automatically. Do NOT interrupt or close the browser while the installer runs. The initial CustomBuild may take several minutes to complete depending on your VPS resources and network. Leave the page open and wait until the progress finishes — interfering can cause a partial build and require manual repair.
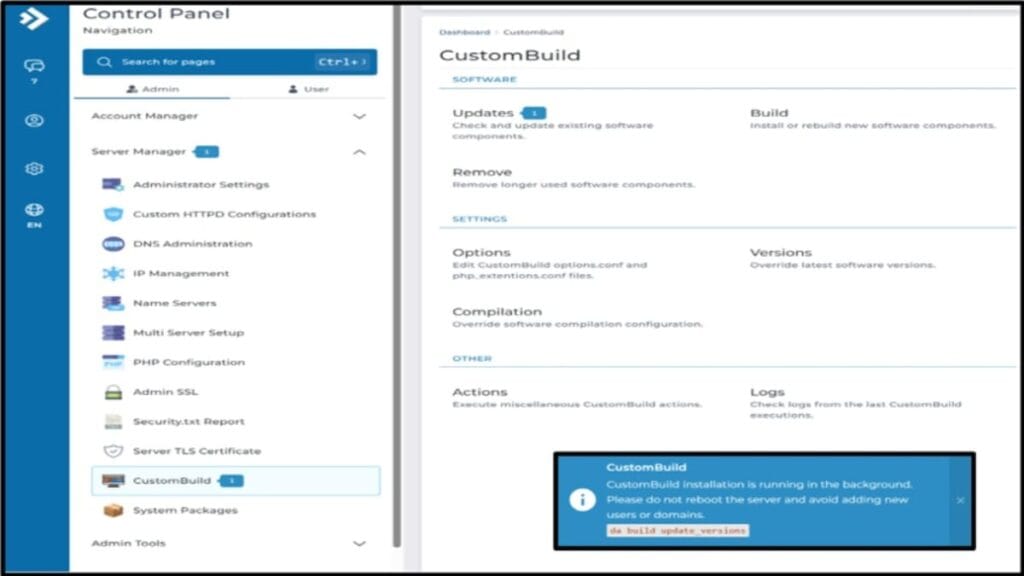
If you want to monitor progress, watch the installer screen for status messages. Do not attempt to run CustomBuild or any other commands during this automatic run. Read the following notes to understand how to know when the update is finished and what various messages mean.
- From DirectAdmin opening session:
- If you see a blue msg box about CustomBuild installation is running, just WAIT; it takes about 5 minutes & screen does real-time auto-updates.
- If you DON’T see the blue msg box & nothing seems to be happening about individual installs, then go to Messages and review them.
- Msg might confirm if CustomBuild installation has finished.
- Msg might also state that php-fpm… is down. That’s okay & gets resolved much later in the setup process.
- If there is no blue box AND you’ve confirmed updates are done (via the msgs check), and you have no pwd change to make, then proceed to next major section ref Schedule Admin Backups.
- There will potentially be no completion msg received if there are any stoppages.
- DON’T REBOOT DURING THIS PROCESS. If blue msg is still present, continue to wait here; it takes about 5-7 minutes until the it goes away.
- That screen refreshes automatically.
- When screen goes away and the updates done, proceed to next steps.
Check for More CustomBuild Updates
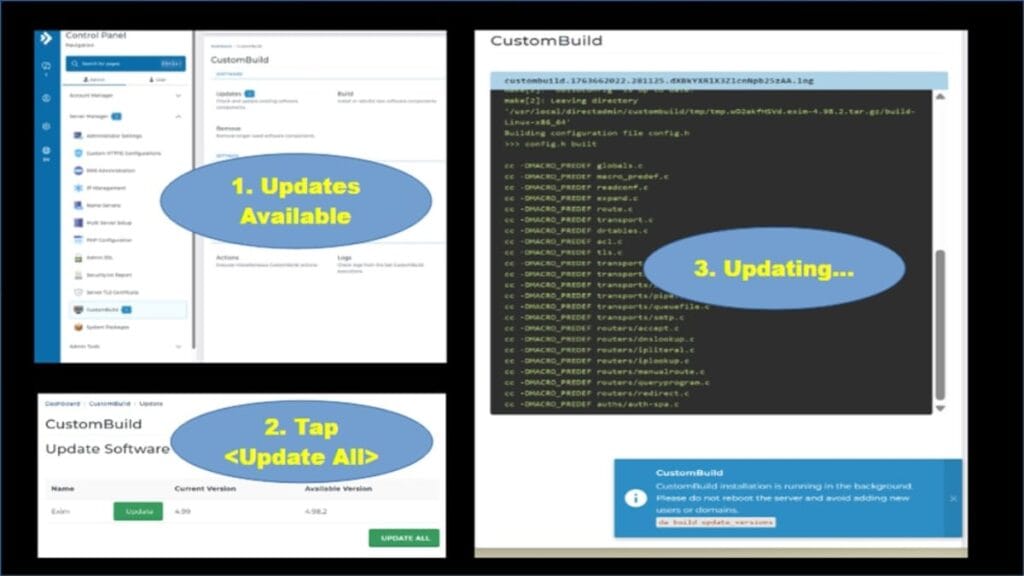
- After earlier blue msg goes away, from <Admin>, go to to <Server Manager> | <CustomBuild>. Tap <Updates>. Review available updates and consider to <Update All>.
- Just as before, don’t tap on anything else and don’t run any scripts until blue message prompt goes away. Remain on that screen until done.
- Then, from far left (vertical pane), tap on Messages to see if “CustomBuild installation has finished”.
- You might see a Message that says “php-fpm… is currently down”. For now, that can be ignored.
- There might be earlier messages that may or may not apply any longer. Take action as needed but generally, I continue to finish other updates, as my steps cover all important aspects in the proper order, and saves total time.
Update System Packages
- From <Admin>, go to to <Server Manager> | <System Packages>. Tap <Update All Packages> and then <Confirm>.
- Wait for the notification count bubble to disappear before continuing. Sometimes, the screen will state “Update finished” but it takes about a minute or two for the bubble count to clear away.
After All Updates, Reboot Server
If no more pending updates are showing, reboot the server. This is easily done via an admin terminal session and enter the scripted word: reboot.
Troubleshooting & Common Errors
Common Installing DirectAdmin Errors and Solutions
- License issues: Verify your DirectAdmin check license and ensure your DirectAdmin license key is valid.
- Port conflicts: Confirm the default port (2222) is open and not blocked.
- Dependency errors: Reinstall missing packages or libraries.
Accessing Official Documentation and Community Forums
- Visit https://docs.directadmin.com for official guides.
- Join community forums for peer support.
Keeping Your Installation Secure and Up-to-Date
- Regularly run CustomBuild update directly in DirectAdmin.
- From the Admin user, go to: Server Manager | CustomBuild | Updates (under Software section)
- Monitor server logs and security advisories.
Quick Commands
Here are some quick command scripts for related portions of what you’re about to use when you install DirectAdmin. But, if you’re here for the How To Guide for installing DirectAdmin, go to the next section “Preparing for Successful Installing DirectAdmin”.
Quick Code Block 1. Update System
# Update system
dnf -y update
Quick Code Block 2. Download Installer (for later installing DirectAdmin)
wget https://www.directadmin.com/setup.sh chmod 755 setup.sh ./setup.sh auto
Quick Code Block 3. DirectAdmin Check License
/usr/local/directadmin/scripts/da_license_check.sh
Conclusion after DirectAdmin Install
Now, on a Linux-based VPS, you’ve learned all the steps for a stable DirectAdmin Install. You’ve seen how you can truly customize the installation of Direct Admin and have typically difficult operations performed automatically on the first reboot. You’ll have your admin credentials pre-established, along with your domain name, 2 nameservers, and EPEL with dependencies.
Now, for the next phases, move forward with your DirectAdmin Setup for things you’ll want like HTTPS (SSL), PHP, adding domains, OpenLiteSpeed (free for fast web server), Mail server, firewall, and WordPress sites.
Next Steps: Configuring DirectAdmin
Now, primarily using DirectAdmin operations, here are some of the next phases for configuring it, in areas you choose to use such as these:
- As soon as DirectAdmin is installed and you can log in, follow DirectAdmin Passwords – Change, Reset & Protect Directories to update default credentials and harden access.
From here, you can use the DirectAdmin VPS home page as a roadmap for the next stages, including domain setup, DNS, email, and backups.
